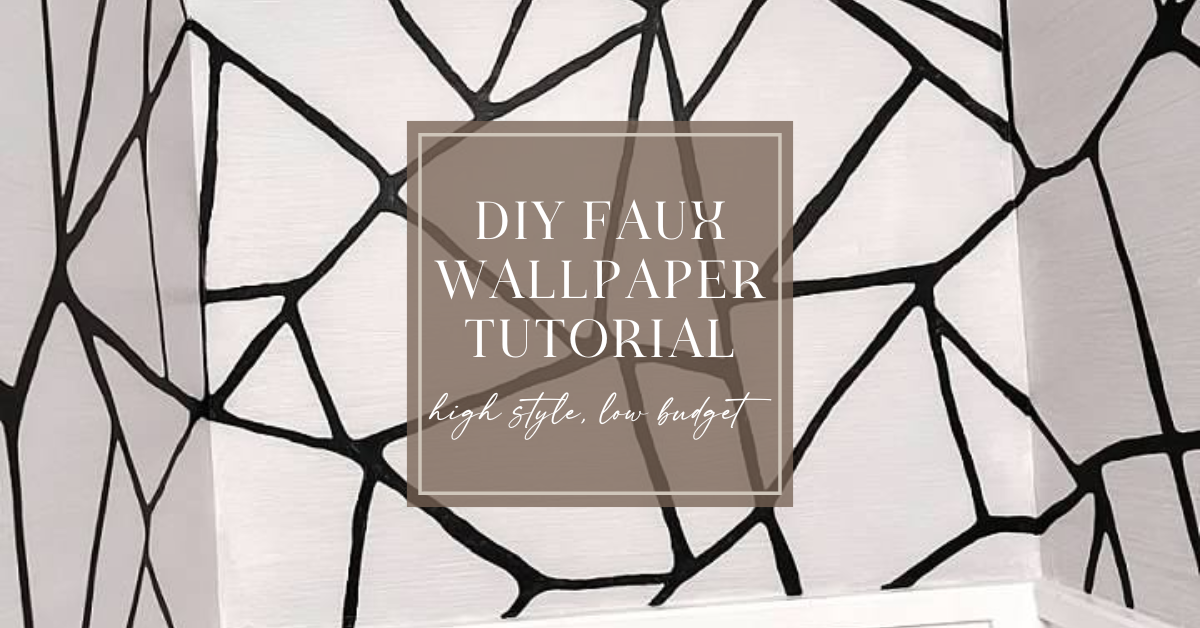
From Dated to Designer — Without the Price Tag
When "FINE" Just ISN'T ENOUGH
We’d lived with our half bath in its “just fine” phase for long enough. You know the kind – functional, clean, and completely forgettable. White beadboard, soft sky-blue walls, and a seafoam green vanity gave it a faintly beachy vibe, but nothing that actually made a statement. It wasn’t awful… it just wasn’t us.
I was ready for a half bath makeover with personality. Something bold. Something textured. Something that would take this small space from an afterthought to a standout feature in our home.
So when I stumbled across a couture wallpaper that had it all: depth, drama, and that high-end, grasscloth-meets-abstract pattern I couldn’t stop thinking about, I was instantly obsessed.
And then I saw the price. $1,000+ for eight yards. Ouch.
However, before I could spiral into sticker shock, inspiration struck: what if I could paint my own version? The texture, the pattern, the high-end energy – for under $100 instead of a small fortune. Slightly unhinged? Maybe. But I had Pinterest, a cart full of paint supplies, and just enough misplaced confidence to dive in headfirst.
This DIY faux grasscloth wallpaper tutorial combines hand-painted texture with a couture-inspired design that looks far more expensive than it actually is. If you’re looking for a budget-friendly weekend project that makes a major statement, you’re in the right place.
Grab a brush – it’s time to get bold.
Before the Glow-Up: From Beachy Blah to Bold Black-and-White
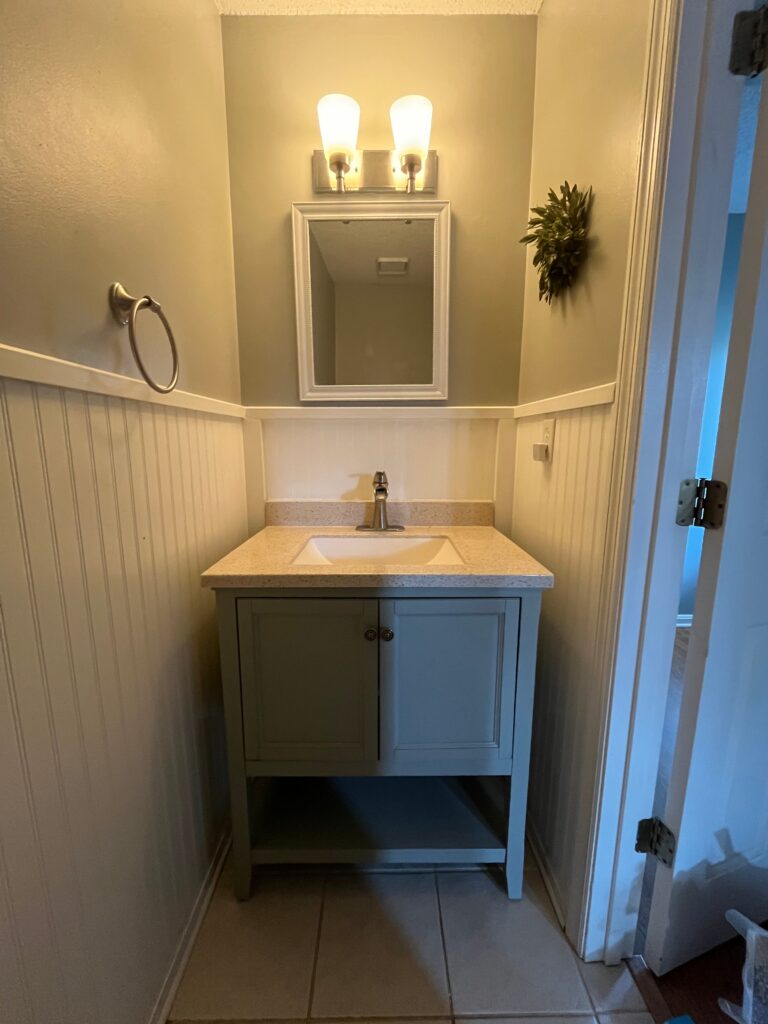
Let me set the scene: our half bath was giving off soft coastal vibes. A subtle nod to beachside charm without ever fully committing. It had classic white beadboard, sky-blue walls, and a seafoam green vanity that whispered “nautical,” but never made a statement. A floating glass shelf above the toilet added a functional touch, but visually? It disappeared into the background. Everything was fine. Just… fine.
However, the biggest problem wasn’t the color palette – it was the lighting. The frosted fixture overhead was dated and dim. Instead of brightening the space, it cast a flat, dull glow that left the room feeling tired and uninspired.
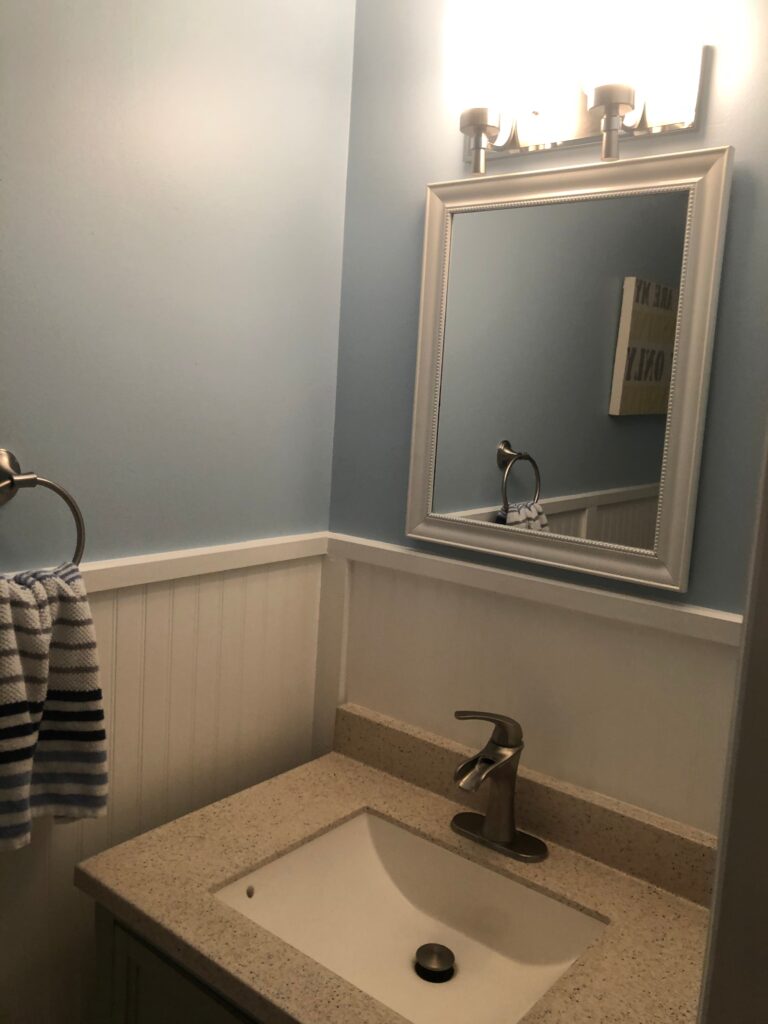
At one point, we tried toning down the beachy blues with Sherwin-Williams Mindful Gray. (Yep, another victim of the Great Gray Era of 2020.) But in a small, windowless bathroom, that soft gray quickly shifted from calm to dreary. What began as a subtle coastal refresh ended up looking more like an overcast afternoon than a designer-inspired retreat.
That’s when I knew this space needed more than just paint. It needed personality, texture, and a high-impact transformation. Enter: the DIY faux grasscloth wallpaper makeover that changed everything.
The Inspiration — And the $1,000 Wallpaper I Couldn't Justify
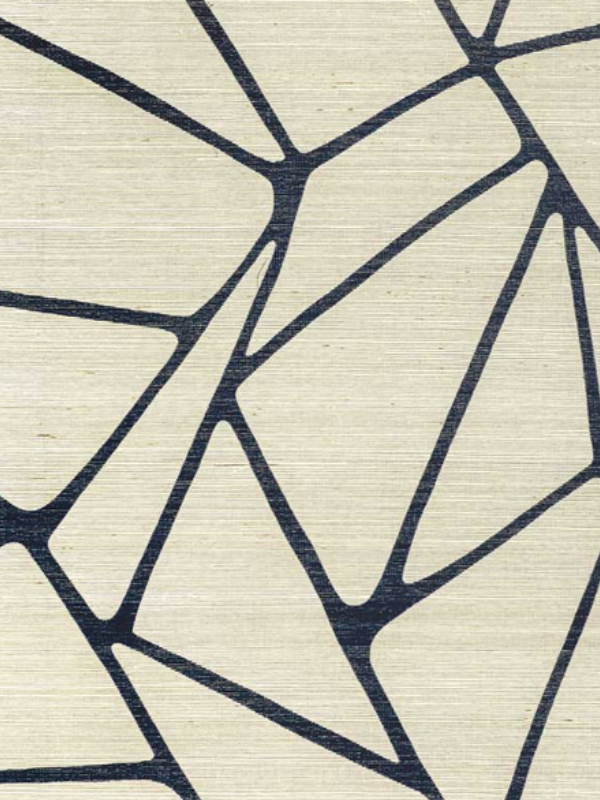
Images – Inspiration: To The Point Wallpaper by Decorator’s Best | Sherwin Williams Color Match App
The second I saw it, I was obsessed. A bold, abstract wallpaper printed on real grasscloth – full of texture, movement, and high-end designer energy I wanted for our half bath. It was dramatic, elegant, and exactly the statement I’d been dreaming of.
Then I saw the price. Over $1,000 for just eight yards.
As much as I loved the idea of bringing that luxury, textured look into our tiny powder room, I couldn’t justify spending that kind of money on something most guests would only glance at during a 90-second pit stop.
So, I did what any budget-savvy, design-loving DIYer would do: I turned to Pinterest. That’s where I found a brilliant tutorial by Diane from In My Own Style, who used paint and glaze to mimic the look of grasscloth. Her version used a basketweave finish, which added a lot of texture, but I had something simpler in mind. I envisioned the classic vertical lines of grasscloth. Less intricate, more understated, and closer to the look of traditional wallpaper panels. Just… painted. On my wall. By me.
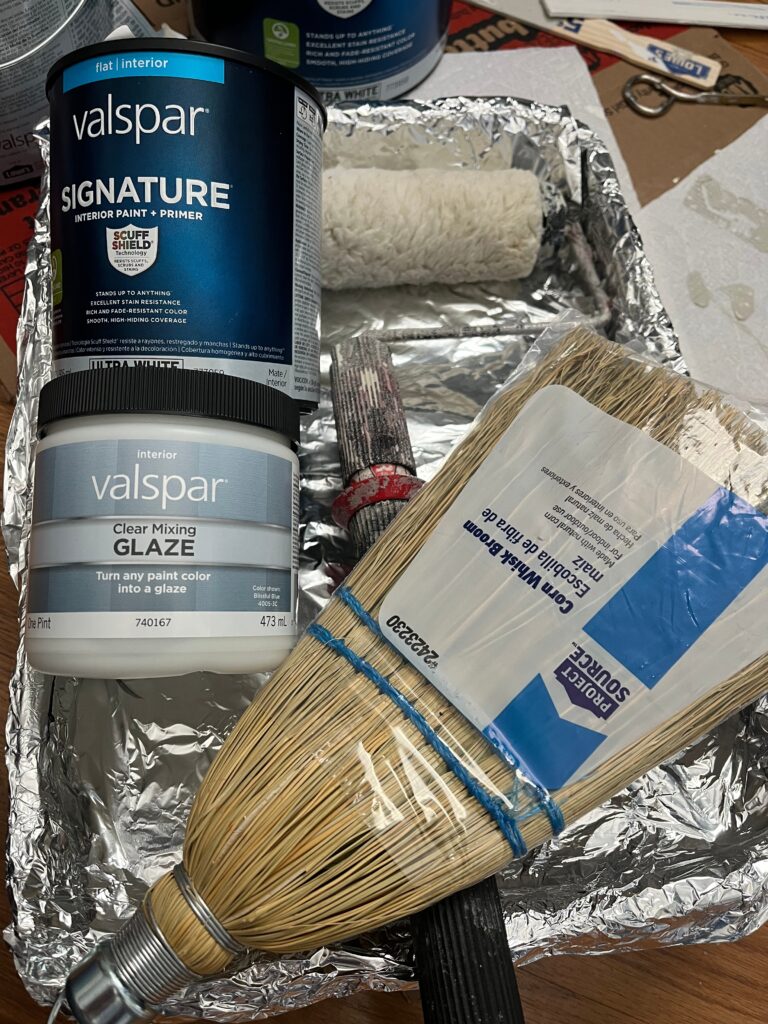
Armed with two shades of paint, a can of clear mixing glaze, and a handheld broom I definitely didn’t buy for sweeping, I decided to go for it. I had no prior experience, no real plan, and absolutely no guarantee it would work.
But I did have one long weekend, a Pinterest board full of inspiration, and the comforting thought that if it all went sideways… I could just repaint and act like none of it ever happened.
Supplies You’ll Need for Faux Grasscloth Wallpaper
DIY Faux Grasscloth and Designer Wallpaper Tutorial
PART 1: CREATING THE FAUX GRASSCLOTH TEXTURE
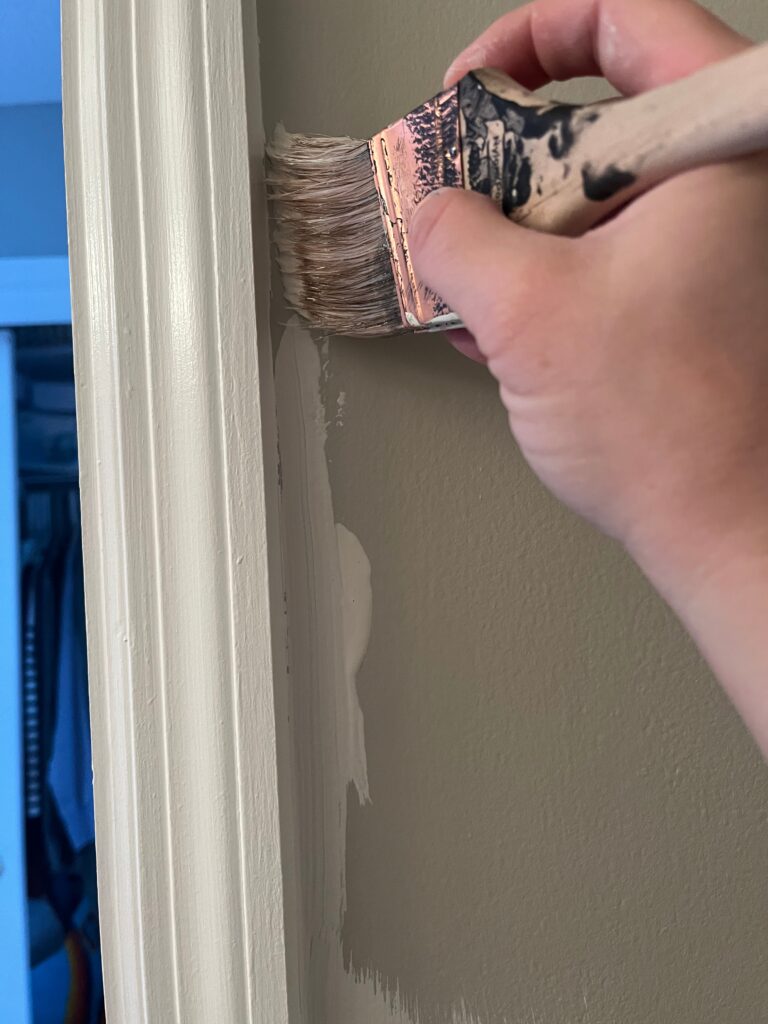
Step 1: Paint Your Base Coat
First, start with a light, neutral base color in a satin or semi-gloss finish – this allows the glaze layer to sit on top of the surface, helping you achieve that woven texture effect. I used Sherwin-Williams Accessible Beige, which provided the perfect backdrop for the look I was going for.
Pro Tip: Avoid using flat paint as your base. It tends to absorb the glaze rather than let it sit on the surface, which can dull the final effect. Instead, opt for a satin or semi-gloss finish to create that ideal foundation for added texture.
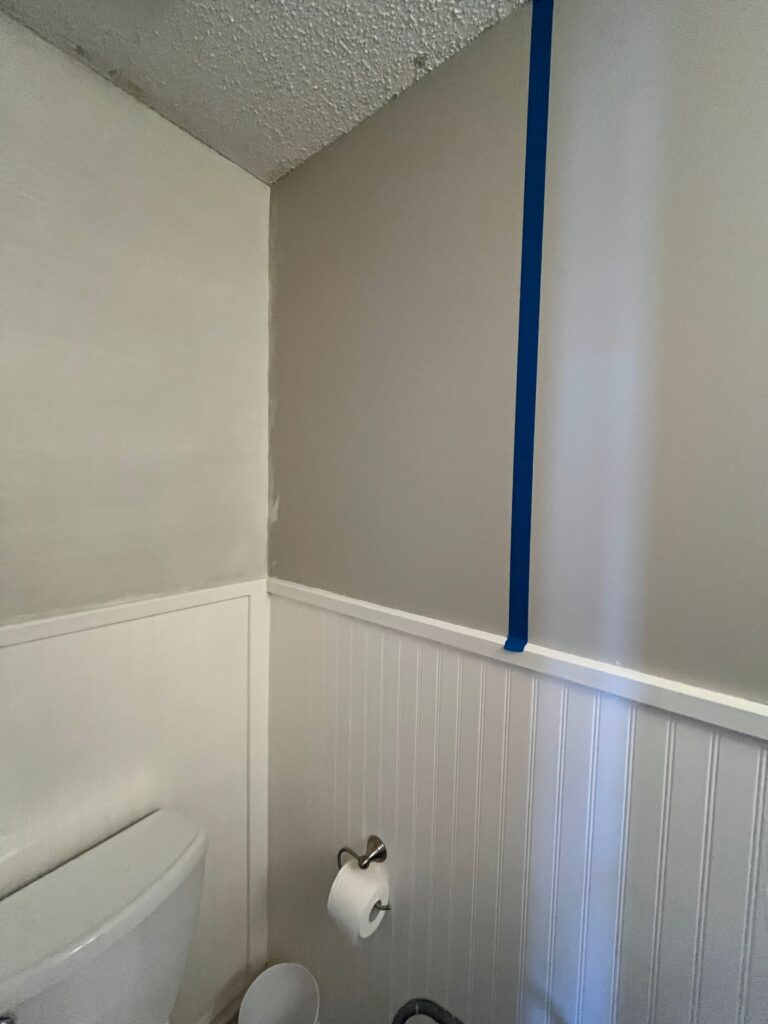
Step 2: Tape "Wallpaper" Panels
Next, use painter’s tape to mark off 36-inch vertical sections across your wall. While this step is totally optional, I highly recommend it. It creates the subtle illusion of real wallpaper panels – an easy detail that makes a surprisingly big impact in the final look.
Even better? The taped sections act as visual guides while you’re applying the glaze. They help you control the length of your broom strokes, keeping your texture lines consistent and easy to manage. Think of the tape like bumpers in a bowling lane. They are there to keep everything from going off the rails.

Images: Taping off sections before the glaze | First section after glaze
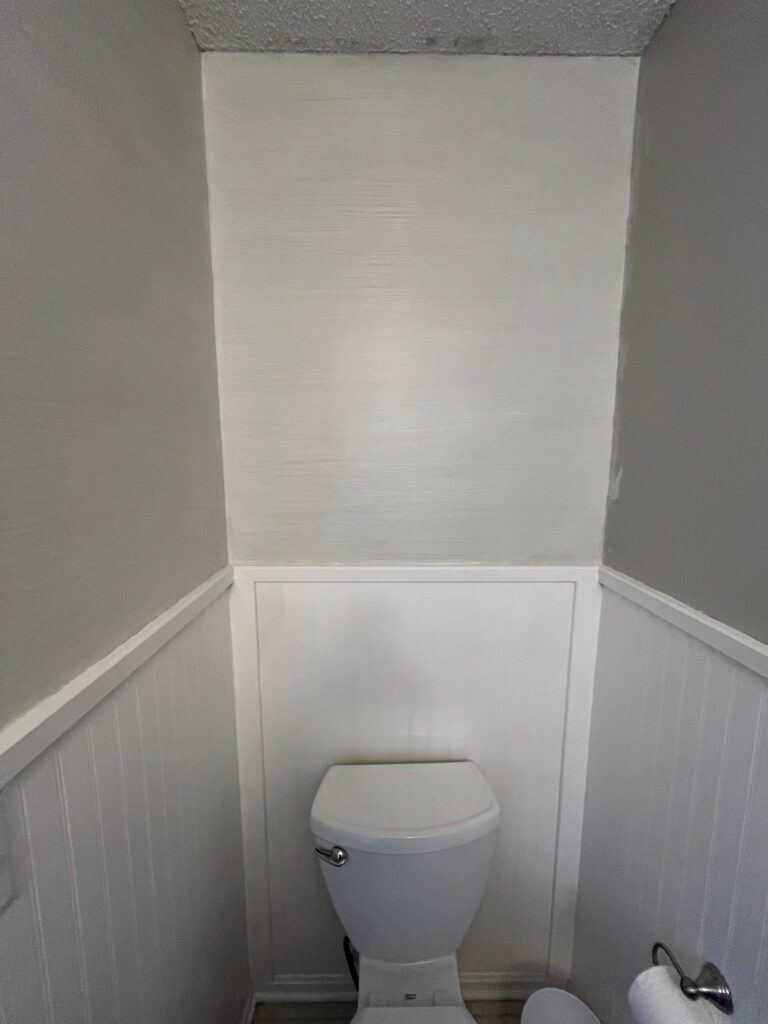
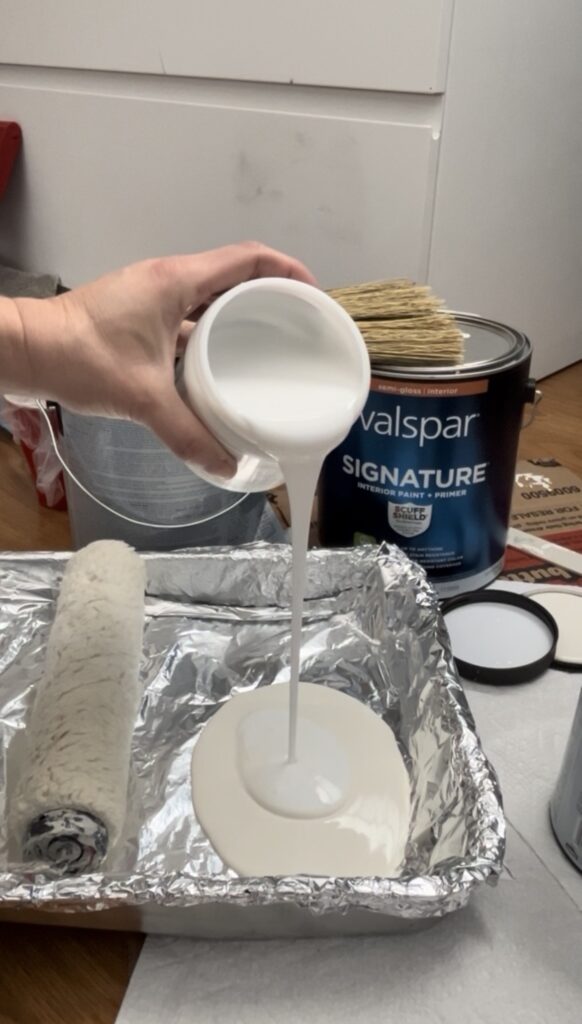
Step 3: Apply the Glaze
Now it’s time to bring your faux grasscloth texture to life.
Start by mixing 1 part Sherwin-Williams Aesthetic White paint with 2 parts clear glaze in a paint tray. You can adjust the ratio slightly if you want more or less contrast – just keep the mixture light, blendable, and easy to work with.
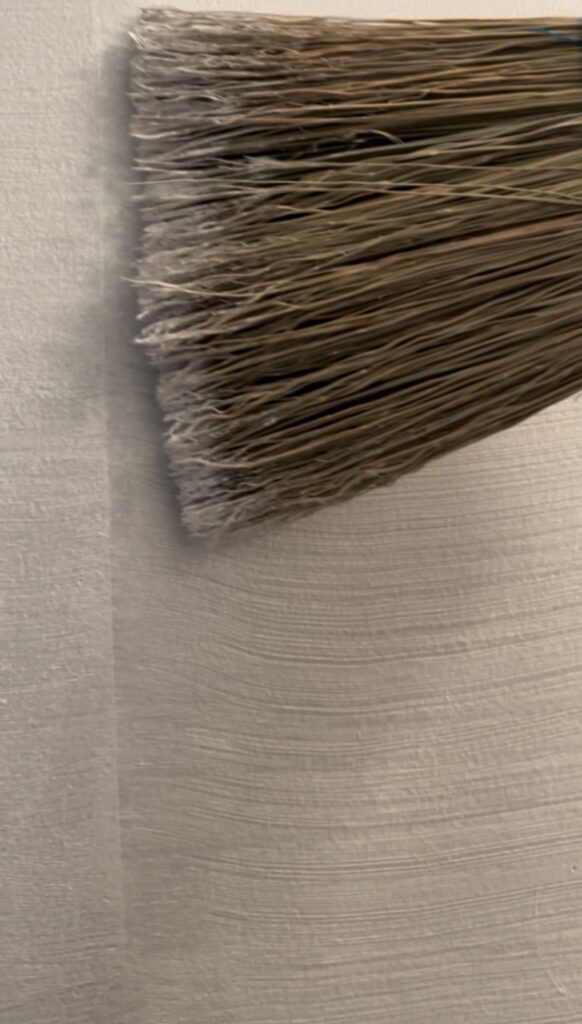
Next, work one taped section at a time. Roll the glaze mixture evenly over the panel, then quickly drag a broom or wallpaper brush horizontally through the glaze. This step mimics the subtle lines and fibers of real grasscloth.
Don’t worry about perfection – in fact, embrace the imperfections. Slight variations and inconsistencies are what give this technique its authentic, handwoven look. The painter’s tape helps keep your strokes consistent and contained, creating a polished finish with just the right amount of texture.
Images: Adding glaze to paint before rolling | Using broom to create grasscloth look
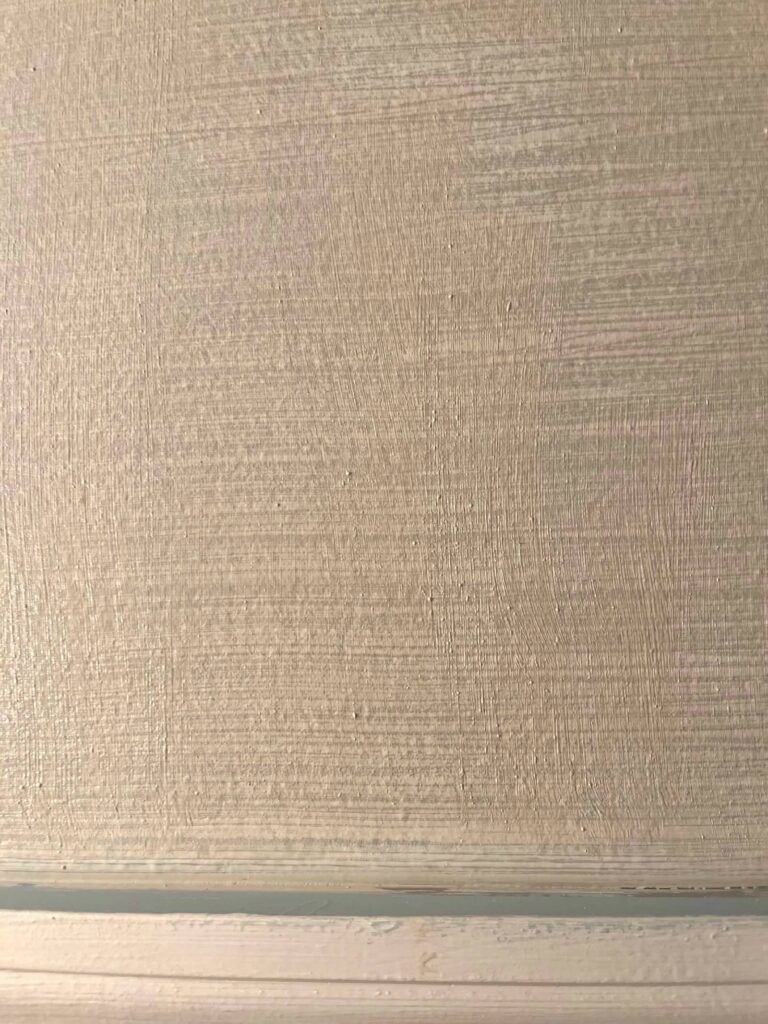
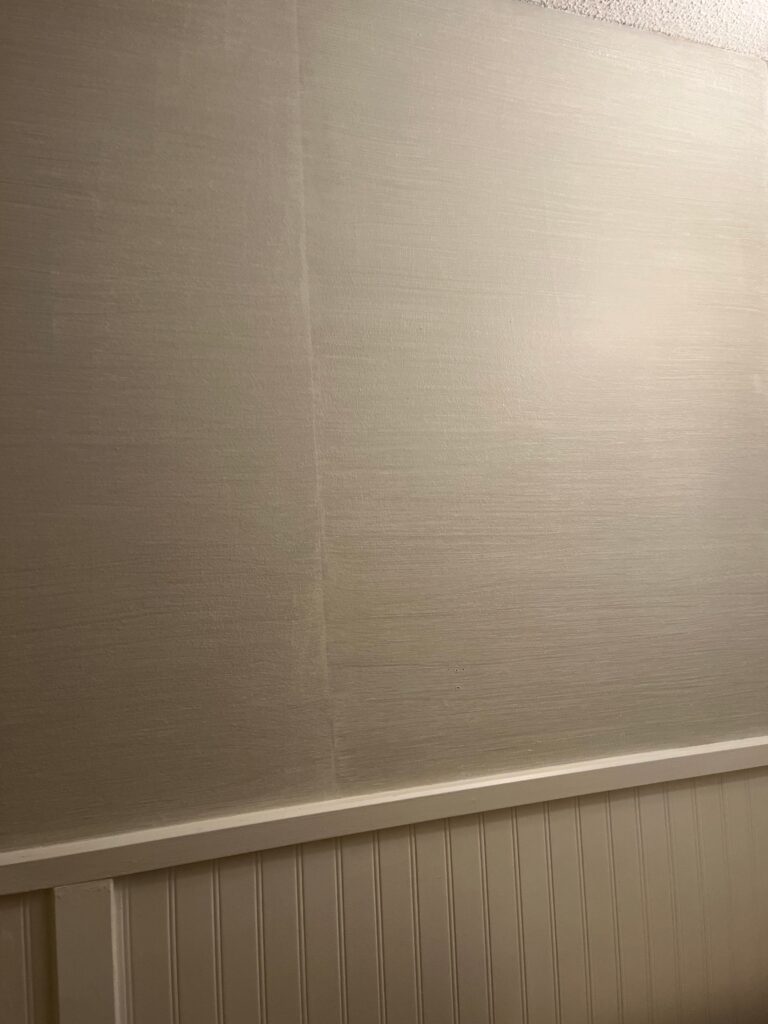
Images: Upclose faux grasscloth | Completed grasscloth look with faux wallpaper seams
PART 2: ADDING THE DESIGNER WALLPAPER PATTERN
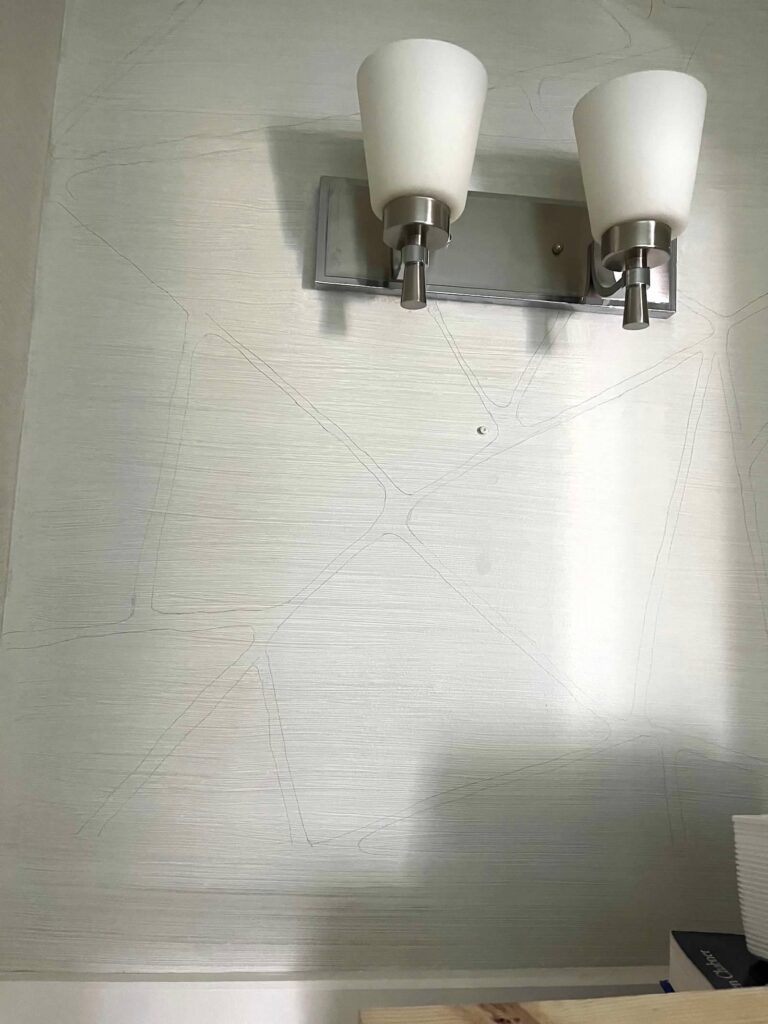
Step 4: Draw or Trace Your Pattern
Now it’s time to move on to the fun part – the pattern!
To start, I borrowed a projector from my local Buy Nothing group to help trace the pattern onto the wall. It was perfect for getting the scale right and mapping out the first few sections. But in a tiny half bath? Unfortunately, it only reached so far.
So, I freehanded the rest – especially the corners, tight spaces, and the wall behind the door. Thankfully, the abstract pattern is super forgiving. Once I had a few lines down, the rest came together quickly.
The hardest part was the corners above the toilet. No room for a ladder, and I was one wrong move away from cracking the toilet seat…or my face if I fell!
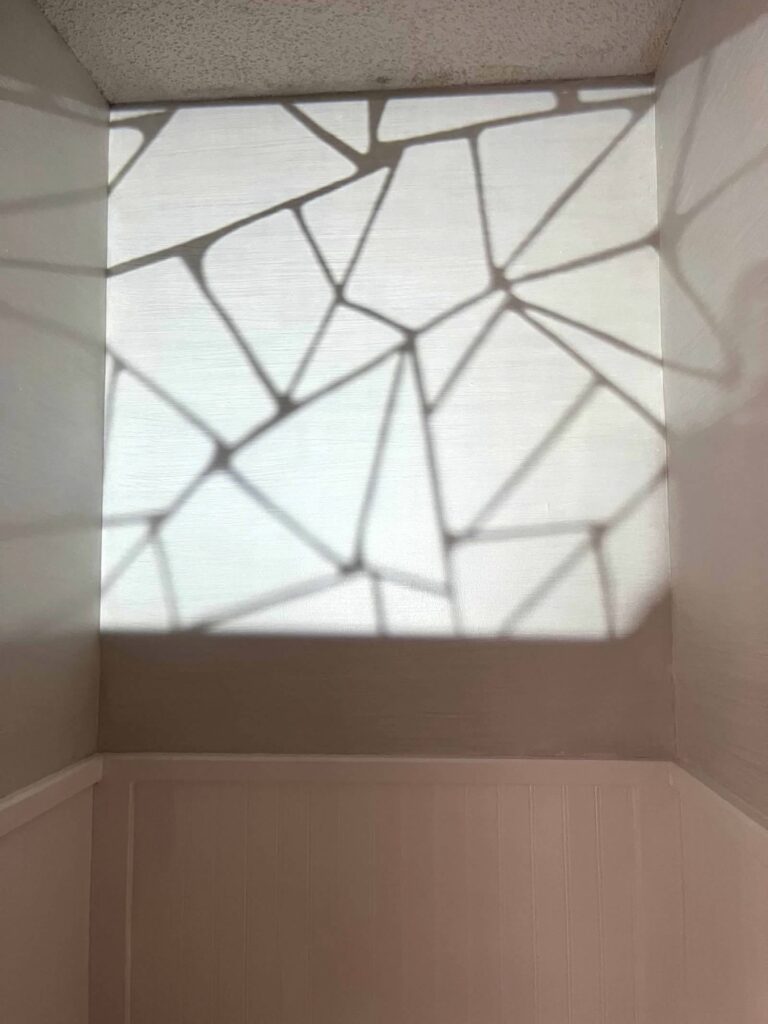
Images: Pattern projected on back wall | Traced image in pencil before paint
Step 5: Fill in your pattern lines with paint
Finally, once your pattern is traced, it’s time to fill it in. You’ll want a few different brush sizes for this part – some lines should be thin and delicate, others bolder – just like the original design. I used an assorted brush pack I had on hand, and it worked great for getting the variation I wanted.
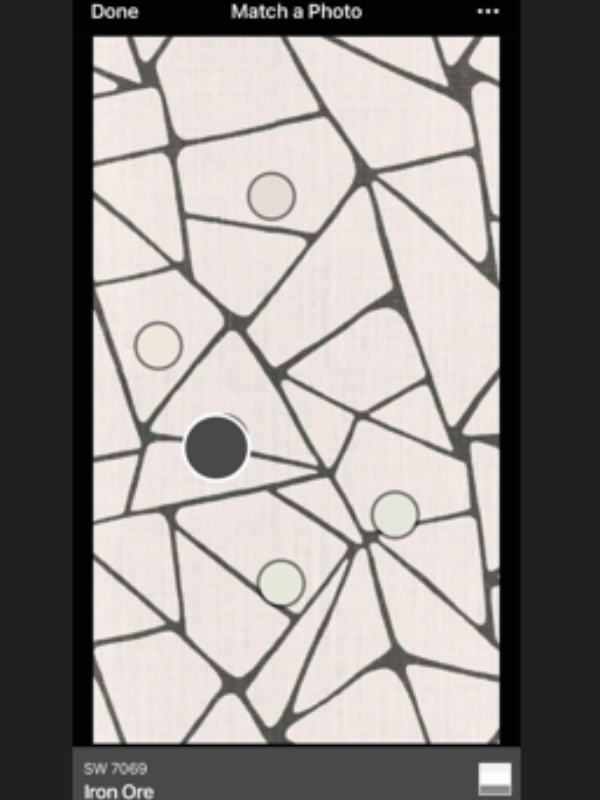
For paint, I went with Sherwin-Williams Iron Ore. It popped up as a color match when I uploaded my inspiration image to their app, and it just so happened to be one of three black shades I already had from another project. Win-win.
There’s no need to aim for perfection here – the pattern is abstract and forgiving, which makes it way less stressful. Once you start filling it in, the wall really starts to come to life.
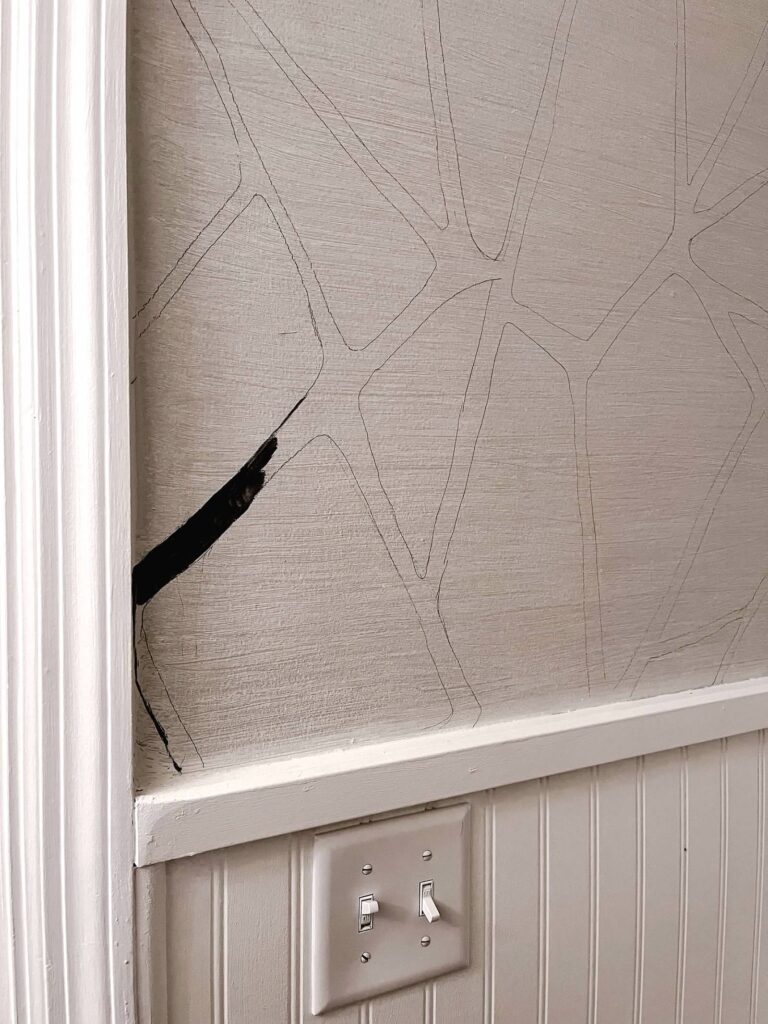
Images: SW Iron Ore painting in progress | Progression of painted lines
Step 6: erase and admire
After the paint has dried, grab a soft eraser and gently remove any visible pencil lines. It’s a small detail, but it makes a big difference in the final look.
Then step back, take it all in, and give yourself a well-deserved pat on the back! You’re officially the kind of person who turns a $1,000 wallpaper fantasy into a weekend reality.

FROM PAINT TO PINTEReST-WORTHY
What started as a basic half bath with dated finishes is now well on its way to becoming one of my favorite spaces in the house. All it took was a little vision, a lot of paint, and the courage to just go for it.
READY FOR MORE?
If this DIY faux wallpaper project has you feeling inspired, you’re in luck – this is just the beginning of our half bath transformation. Up next, I’m focusing on making a big impact with simple updates, no demo required. Think fresh paint, smarter storage, and a few swaps that make the whole room feel intentional, elevated, and anything but an afterthought.
Shop the whole room here and stay tuned for Part 2 to see the full transformation!